DIY Christmas Decor by Theme

Nov 30, 2011

There are so many different Christmas themes out there: bright/cheery, snowflake white, candy cane colors, etc. That's why I put together one big post so you can check out all the Christmas home decor to match your home! (If you have some more, add a link in a comment and I'll consider adding it to this post)

Fun, Bright, Cheery
Ornament Wreath
Tip Junkie
finished_glitter_bulbs.jpg
Vintage Glitter Bulb Ornaments
Craft: Transforming Traditional Crafts
DIY Christmas Wreath and Garland
Mom And Wife

White (plus some silver and blue)
Layered Ribbon Trees
Sparkle

Cardboard Glitter Snowflake Ornaments
Deck Out My Home

Paper-Doily Wreath
Paper-Doily Wreath
Martha Stewart


Candy Cane (red and white)
Peppermint Ornament
Martha Stewart
Candy Cane Bouquet
Find the photo HERE
(I honestly couldn't find a tutorial but I'm sure it would be easy enough)
Giant white craft stick snowflakes
Popsicle Stick Snowflakes
Crafty Nest
Santa Classic

053
Styrofoam Santa Hat Cones
Thrifty Decor Chick
Santa Belt Ornament
Our Forever House

Confetti Bracelet

Nov 20, 2011

A cute, simple project that will gleam in the sun!

 Supplies: - confetti sequins (with holes in them), stretchy string, and glue
 String a sequin on stretchy string that fits your wrist (with about four inches extra as well)

Handmade Cards

Nov 19, 2011

I went to a friend's house today and made a hoard of homemade cards. I used these adorable owl stamps!!! Here they are:
 I LOVE the look of this card. It was supposed to look vintage, and here are the things that make it vintage:
• The faded owl
• The sloppy 'straight' letters
• The way the corners of the stamp are shown too
• The color green. I don't know why, but that color of glitter glue made me think of vintage
 Here's another Owl card!
 A faded pink owl with green I's dotted all around to create a border

I also decided to do some Christmas cards! Here are some of my ideas:
 My friend, Hannah, used the star (*) as a snowflake for one of her cards. I used it as trees and used silver glitter glue to make snow
 This one is cute because of the little red dots on the letters and the little golden bells. 

I LOVE making cards of bees! Their dotted 'trail' is so fun!

I hope you enjoyed these cards! Now go make your own!
xo. Kate

Foam & Things Christmas Tree


I wanted to make my friend a cute decoration for her bedroom for Christmas, which is probably my FAVORITE time of the year.

Supplies:
Green craft foam
A small plastic cup (for base)
A chenille stem
Hot glue
(I also used Elmer's)
Red felt (just enough to cover the base)
Red embroidery thread
Construction paper

 Start by cutting out a shape like this (test it over and over to make sure it makes a nice cone shape)
 Now roll it up and glue it. I used tape to keep it shut and let it dry over night.
 In the morning:

Nov 15, 2011

Today I won a giveaway. It was a gift card to the Ribbon Retreat over at Tatertots and Jello. I was OVERLY happy that I won!!! I have now become a giveaway fiend, finding all the giveaways on my favorite craft sites. I'd like to share my favorite sites:

See Kate Sew
This is one of my favorite blogs. Here are some of her projects!
DIY big-to-small Hoodie

Chevron Clutch Tutorial
Evie S
Another one of my favorite blogs - she is so creative and makes great art!

Ruffle Lace Bracelet

Nov 13, 2011


Supplies:
a Strip of Lace
String
Glue

 I had all this lace to work with, so I decided to make a bracelet. Here's the 'ribbon' lace:


How To Remove Dried Hot Glue

Nov 9, 2011

 This is a problem with me often. Sometimes I hot glue something, then decide to remove it or change it. So today I'd like to share with you how I do that! =]
This is what the glue looks like all dried. I had a bow on there, but I pulled it off. This glue has been there for about 3-5 hours.
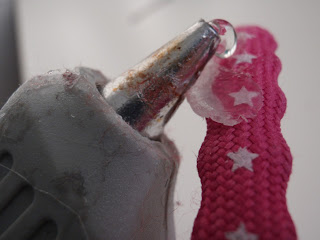
 Problem solved! Plug that hot glue gun right back in and use it's heated metal part to melt the glue back into liquid. (If your glue gun is like mine, some glue will leak out of it. Ignore it. It's okay to get more glue on the already dry glue)
Now repeat the last step over and over again until most of the glue is off. The picture above is the part where the glue was pulled off. 

I hope this helped you!

Inspire. Create.

Linking to:

Tie Snake Toy

Nov 8, 2011


Isn't he cute??? I created him for someone else, but I think I'll have to make another one for them because they're so cute!


 Sssss......

Ok. Let's get started!

Supplies:
An old tie (A striped one looks best, feel free to experiment)
Red felt (just a bit for the tongue)
Two black beads
A needle and thread
Half a bag (or less) of rice
a funnel
A hot glue gun and LOTS of extra glue sticks
Scissors (fabric scissors are good)
(Also, before we begin, I'd like to apologize for the lighting/clarity in the photos.
That's what you get when you have one tiny lamp that you can't even get to stretch all the way to your table)
 Okay, start with the tie.
I forgot to take a 'before' picture of the tie, so here it is before with some of the supplies
Cut off the tag.
 Cut the tie about two or three inches longer than you actually want the snake to be
 The tie started falling apart so I glued where the seam was because I don't trust my sewing

 Now place the funnel inside the open end and pour rice inside. Do it slowly with only a little bit at a time to allow the rice to sink to the bottom. (I had to stuff the rice down with a wooden stick)
 Here's the snake all stuffed
 Glue on a 'Y' shaped piece of felt (when I finished, I touched it up with a few more layers to make it sturdier)
 See the tail, all glued? It looks pretty boring.
I just snipped it, and glued the edges
I had to glue all the holes that the tie had because ties are not meant to hold rice ;). The seam in the back was only closed every centimeter or so, so I glued inside each of those.

Now simply stitch on the beads for the eyes and you're done!

xo. Kate