Recently I have been ad swapping with lots of other amazing bloggers.
It has been a lot of fun meeting new awesome people like you!
Ad swapping with each blog means a different sized button each time I swap! That means re-doing computer HTML every time.
Ad swapping with each blog means a different sized button each time I swap! That means re-doing computer HTML every time.
(If you are unfamiliar with HTML, basically its like computer language. If you type in certain symbols and codes, the computer translates it into spaces, bold-ing words, letter size, font, etc.)
When I first started blogging, I couldn't figure out how to make a blog button. It seemed like everyone had them! I had tried numerous times, using online guides and websites to help me. It. didn't. work!
I'm hoping this method will be helpful to you and other bloggers who think:
"How in the world does this work?"
-----------------------------------------
Start by creating your button. Here's a simple tutorial using Pic Monkey, an online photo editing site that is just like Picnik.
Start by uploading a blank square to PicMonkey (or Paint, or Photoshop, or whatever digital program you use)
Decorate with shapes and words.
Save it!
Go to Photo Bucket and click 'upload' (green button at top of page).

To get the button on your blog, go to blogger dashboard>layout>add a gadget>HTML/JavaScript


Pretty cool, huh?
Every time you make a new button, you can use the same code, just change the HTML code grabbed from Photobucket.
------------------------------------------------------------------------------------------
Now for part 2 of this post - how to add a grab box underneath your button so others can grab your shiny new button!

Go back to Photobucket. Now, copy the "Direct link" when you scroll over the photo.
Insert all your info into this code below:
When I first started blogging, I couldn't figure out how to make a blog button. It seemed like everyone had them! I had tried numerous times, using online guides and websites to help me. It. didn't. work!
I'm hoping this method will be helpful to you and other bloggers who think:
"How in the world does this work?"
-----------------------------------------
Start by creating your button. Here's a simple tutorial using Pic Monkey, an online photo editing site that is just like Picnik.
Start by uploading a blank square to PicMonkey (or Paint, or Photoshop, or whatever digital program you use)
Decorate with shapes and words.
Save it!
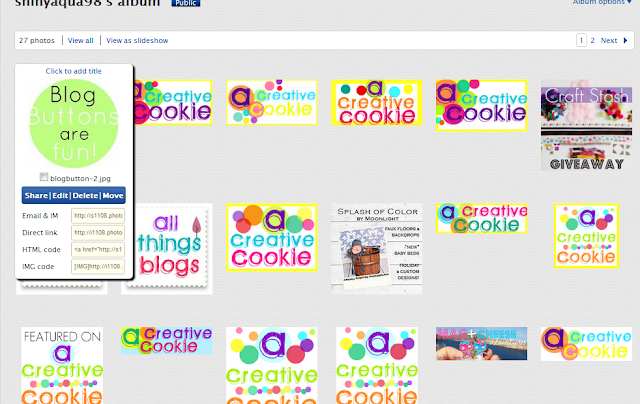
Go to Photo Bucket and click 'upload' (green button at top of page).
Upload your photo and copy the HTML CODE (drag mouse over the photo for copy options).
Please ignore my very odd photos and others' buttons. ;)

This is how to get your code. Fill in the red fill-in-the-blanks:
<a href="YOUR BLOG URL HERE"><img src="YOUR HTML HERE
It may look weird, and you might be tempted to add that extra quotation mark at the end ["]. Don't. I promise the code above is exactly how it should be.
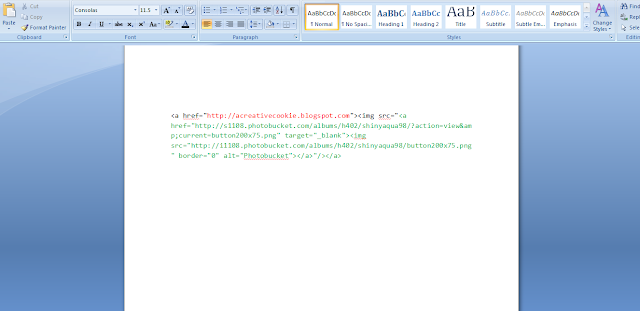
Example: <a href="http://acreativecookie.blogspot.com"><img src="<a href="http://s1108.photobucket.com/albums/h402/shinyaqua98/?action=view&current=blogbutton-2.jpg" target="_blank"><img src="http://i1108.photobucket.com/albums/h402/shinyaqua98/blogbutton-2.jpg" border="0" alt="Photobucket"></a>
Make sure your blog URL has http:// before it.
Now you have your code!
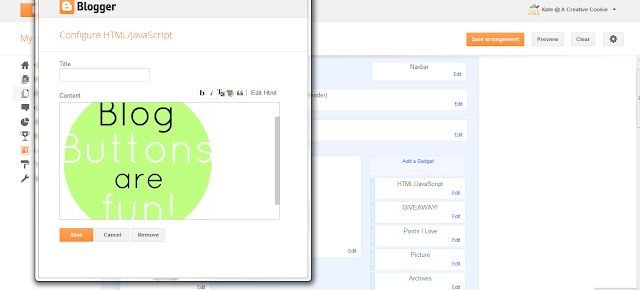
To get the button on your blog, go to blogger dashboard>layout>add a gadget>HTML/JavaScript
Insert your code under the HTML section (the little button on the top right of the text box will either say "Rich Text" or "Edit HTML". Click "Edit HTML"

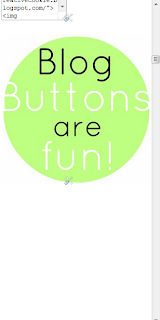
Now click the "Rich Text" button and check out your button! Click save and view your blog.

Say hello to your new button!
Pretty cool, huh?
Every time you make a new button, you can use the same code, just change the HTML code grabbed from Photobucket.
------------------------------------------------------------------------------------------
Now for part 2 of this post - how to add a grab box underneath your button so others can grab your shiny new button!

Go back to Photobucket. Now, copy the "Direct link" when you scroll over the photo.
Insert all your info into this code below:
<textarea
name="textarea" cols="40" rows="4"
wrap="VIRTUAL">
YOUR FIRST CODE HERE
</textarea>
YOUR FIRST CODE HERE
</textarea>
---------------------------------------------------
Example:
<textarea name="textarea" cols="40" rows="4" wrap="VIRTUAL">
<a href="http://acreativecookie.blogspot.com"><img src="<a href="http://s1108.photobucket.com/albums/h402/shinyaqua98/?action=view&current=blogbutton-2.jpg" target="_blank"><img src="http://i1108.photobucket.com/albums/h402/shinyaqua98/blogbutton-2.jpg" border="0" alt="Photobucket"></a>
</textarea>
<a href="http://acreativecookie.blogspot.com"><img src="<a href="http://s1108.photobucket.com/albums/h402/shinyaqua98/?action=view&current=blogbutton-2.jpg" target="_blank"><img src="http://i1108.photobucket.com/albums/h402/shinyaqua98/blogbutton-2.jpg" border="0" alt="Photobucket"></a>
</textarea>
You can customize the size of the grab box by changing "cols=40" and "rows=4" to whatever size you want.
Now add that code right underneath your first code and insert that into the HTML gadget. It's a lot of code!
Sometimes you will see a little extra photo icon (or an extra bracket or some other symbol) next to your button. Simply highlight it and delete it.
Click 'Save'
(screenshot)
Ta Da!!!
You have a beautiful button that all your friends can grab!
I hope this helped you with creating your own button. Once you make yours, I'd love to swap with you! Find the info HERE.
Thanks to Smilemonsters' post with very helpful tips and EBlogger Tricks for the info on the grab box.
They really are the ones who should be thanked!
Happy creating!
xo. Kate


